2 - Installing and Starting (Applies to UD-Series)
2.1 - Installation
The LabJack software must be installed on any machine that uses the LabJack device, and should be installed before you plug the device into the USB port. DAQFactory Express and the 25 day trial of DAQFactory Pro are separate installers that can be downloaded from the Azeotech website. DAQFactory installers do not include the low level LabJack drivers, so you must install the drivers that come from LabJack to use their devices.
Note: If you get a alert message in DAQFactory saying that it is unable to load the LabJackN.dll file then you probably forgot to install the LabJack drivers from LabJack. Go to labjack.com for the latest drivers. If you upgrade DAQFactory (by going to www.azeotech.com) or DAQFactory Express (by going to www.daqexpress.com), you will most likely also need to ensure that you are using the latest LabJack drivers. You should therefore go to labjack.com and download and install those drivers as well.
2.2 - Device Setup
Once installed, and if necessary, rebooted, you’ll want to quickly make sure your new device can be found, and set its ID. If you are going to connect over Ethernet, we strongly suggest you perform this step over USB first:
Plug in your new device into a USB port.
For maximum capabilities, we recommend plugging into a USB port directly on the computer or to a powered USB hub. If you plug into an unpowered USB hub, you may run into sourcing limitations. This can also occur if you have multiple devices plugged into the hub, even if it is powered.
Go to Start – Programs – LabJack – LJControlPanel.
The complete documentation for this program is installed with the LabJack driver, but there a few more steps to perform before starting DAQFactory.
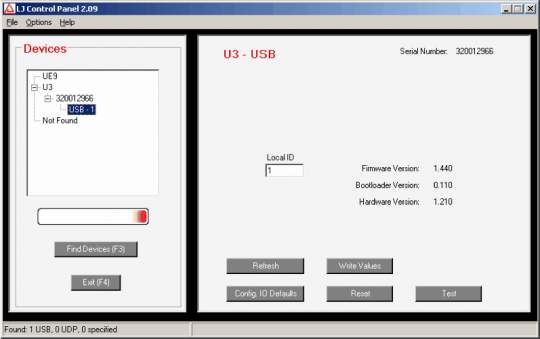
Click on “Find Devices”.
This will search and hopefully find your new device. If your device is not found, you should refer to the LabJack User’s Guide for more assistance.
Once found, click on the device.
This will display current information about the device and an option to run a test panel. You may want to click on the test panel just to see that you are receiving signals.
Set the ID: you should set the ID of your device to a non-zero value.
If you are using multiple LabJacks, the ID will need to be unique. Zero is used by DAQFactory to indicate “First Found” and so cannot be used as LabJack ID. If you are using Ethernet, the ID is not required, but we still recommend using unique non-zero ID’s just in case you plug it in to the USB port.
Save your settings and close the application.
2.3 - Starting DAQFactory
Now you can start DAQFactory and start taking some data:
From your Start menu, select Programs => DAQFactory Express => DAQFactory Express. A splash window will appear, followed by the application:
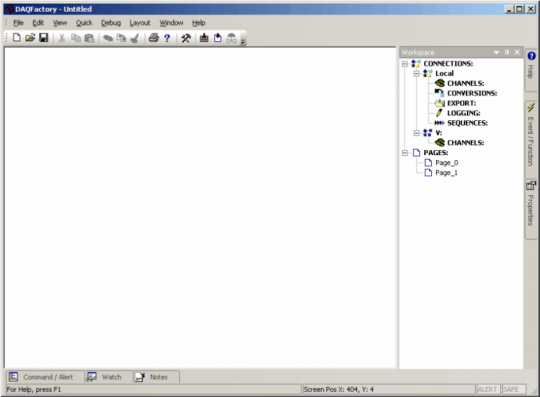
The DAQFactory application is setup like most windows applications with a title bar at the top, a menu underneath, a toolbar underneath that and a status bar at the bottom. In addition there are a number of docking windows. A docking window means a window that can be “docked” or attached to the one side of the main application window. At this point, there are three important docking windows. Along the right is the Workspace. The Workspace is a listing of various elements of DAQFactory you will work with, such as channels, scripts, logging sets and pages. Also along the right, but initially tabbed, is the help window. Click on the Help tab to display the help window.
Along the bottom is the Command / Alert window. Normally it is rolled up, but if you click on the Command / Alert tab, it will appear. To have it stay visible, click on the thumb tack at the top right corner of the window.
The Command / Alert window allows you to manually type in commands. More importantly for the new user, this area displays any error messages that DAQFactory or your LabJack device might generate. Unlike most applications, DAQFactory does not pop up error message windows. This is because there are many situations where you may get a large number of continuous errors. For example, if you accidentally unplug your device while taking data. Instead of generating a huge number of windows with repetitive messages that you have to dismiss, DAQFactory puts all the messages into the Command / Alert window. This works well, but can sometimes be confusing, as the error message will remain in the Command / Alert window until it gets scrolled off the screen. To ensure that you don’t confuse an old error message for a new one, you can right click on the command / alert window and clear the display.
If for some reason you can’t see any of these windows, go to the View menu and select the desired window.
Note: we strongly recommend keeping the Command / Alert window visible when you are starting, even though it takes up screen space. If you hide it, you may miss important alerts. The window will flash when an alert occurs, but this is not as apparent as a real message.
2.4 - Ethernet setup
The LabJack UE9 offers both USB and Ethernet connectivity. So far, we have discussed communicating with LabJacks over USB. To connect to an Ethernet LabJack requires an extra few simple steps as the D# column of a DAQFactory channel only accepts numbers and not IP addresses:
Click on Quick - Device Configuration from the DAQFactory main menu. A new window will pop up.
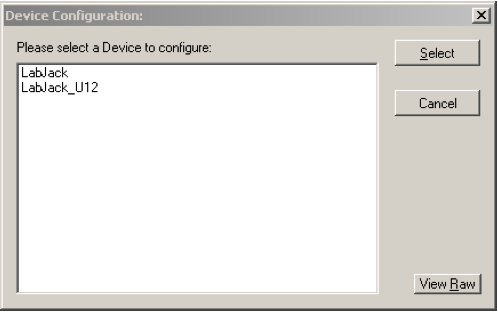
Select LabJack from the list of available devices. A new window will appear.
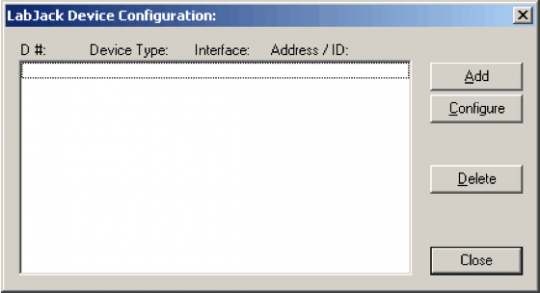
Click on the Add button to add a new LabJack device.
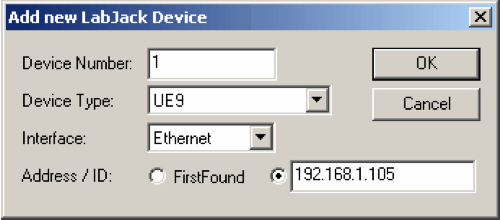
In the new window, select a unique device number to assign to this device.
This number should be unique among any other LabJack devices, even USB ones, as this is the number DAQFactory uses to identify the device.
Select UE9 and Ethernet interface, and put the IP address of your device in the Address space.
Click OK.
The new device will be listed in the window. Depending on your DAQFactory installation, you may see a "Configuration" button. We do not recommend using this button to configure your LabJack, and it is considered deprecated. Instead, use the techniques described later in this guide.
Click OK to close this window.
At this point, the LabJack with the given IP address has now been assigned a device number that you can use everywhere you'd use the LabJack ID in DAQFactory. We have mapped the IP address to a device number. Do not use the LabJack's ID, but the device number instead.
