3.4 - LJlogger [U12 Datasheet]
LJlogger sends and receives data in command/response mode by making 2 DLL calls to “AISample” and 1 DLL call to “AOUpdate”. It is capable of logging data to disk (2 Hz max) and performing various actions on trigger events.
The first column in the data file is a timestamp of seconds since midnight January 1st (Universal Time), 1904. The default time format in Microsoft Excel and Open Office Calc is days since 1900, so to convert divide by 86400 (seconds/day) and add 1462 (days from 1900 to 1904). To convert from Universal Time to local time, subtract the difference in days, so for Colorado, USA, we would subtract -0.291666667 (7 hours divided by 24 hours/day).

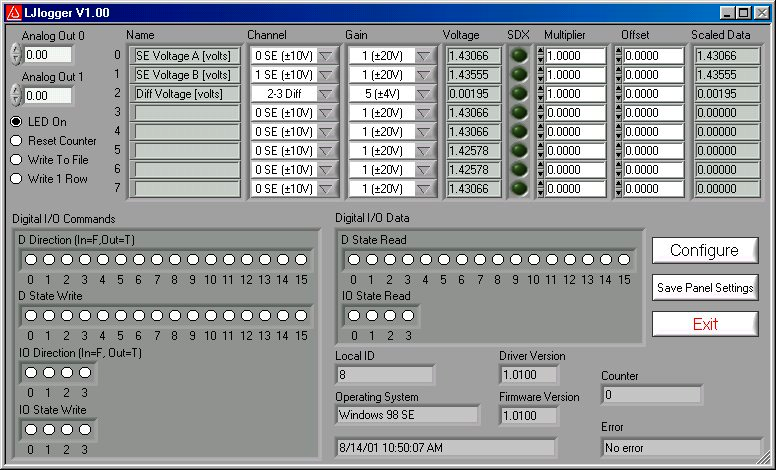
Figure 3.4-1
The main window for LJlogger is shown in Figure 3.4-1. The white colored items and the “SDX” buttons are controls to be edited/selected by the user. The grey colored items are indicators which display various information about the LabJack. Clicking the button labeled “Save Panel Settings” will save the current values of the controls as the default values.
If SDX is activated for a given analog input, the corresponding SDXDLL will be used to determine the scaled data. Users can make their own SDXDLLs (see the source code for more information), to provide more complex scaling or scaling that depends on other analog inputs.
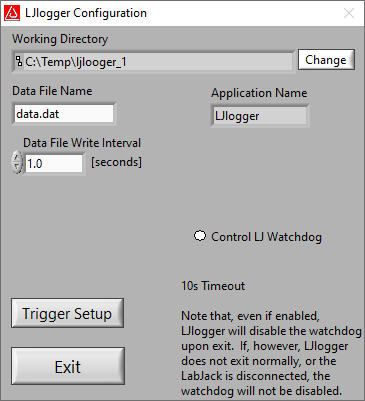
Clicking the “Configure” button shown in Figure 3.4-1 brings up the window shown in Figure 3.4-2:
Working Directory: This is the directory where data and configuration files will be written.
Data File Name: Determines the name of the data file to which data will be written. New data is appended to the end of this file.
Data File Write Interval: Determines the interval at which a new row of data will be written to the data file. Minimum of 0.5 seconds.
HTML Write Interval: Determines the interval at which the HTML file is rewritten.

Figure 3.4-2
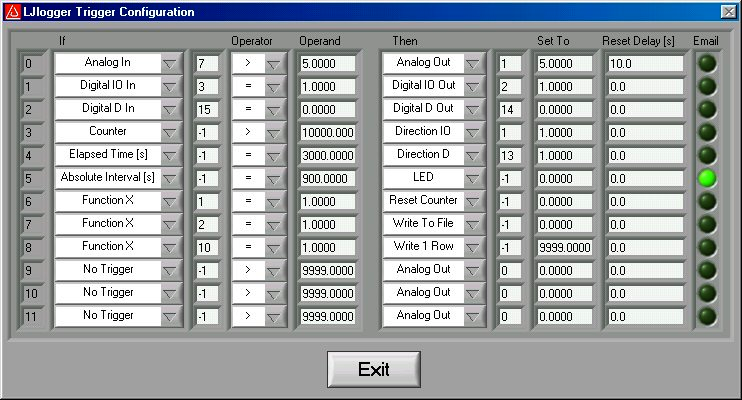
Clicking on the “Trigger Setup” button in Figure 3.4-2 brings up the window shown in Figure 3.4-3.

Figure 3.4-3
Figure 3.4-3 shows 9 example triggers:
Trigger #0: If the scaled data from analog input row 7 (Figure 3.4-1) is greater than 5, then set AO1 to 5 volts. Once triggered, there is a 10 second delay before it can be triggered again.
Trigger #1: If IO3 is high, set IO2 high. Reset delay is zero so this trigger can occur every iteration (every 0.1 seconds) if IO3 is high.
Trigger #2: If D15 is low, set D14 low.
Trigger #3: If the count is greater than 10,000, set IO1 to an output.
Trigger #4: If it has been 3000 seconds since LJlogger started, set D13 to an output.
Trigger #5: When the PC’s clock is at 15 minute intervals, the status LED will be turned off and an email will be sent.
Trigger #6: Calls FunctionX from function1.dll. If the function returns True, reset the counter. Users can make their own FunctionX DLLs. See the source code for more information.
Trigger #7: Calls FunctionX from function2.dll. If the function returns True, stop writing data to file.
Trigger #8: Calls FunctionX from function10.dll. If the function returns True, write 1 row to the data file.
