LJTick-Resistance Datasheet
The LJTick-Resistance (LJTR) makes it easy for LabJack devices to measure resistive sensors. This tick gives users a regulated 2.5V signal that can be used as a excitation voltage and a known resistance value (1k, 10k, 100k, or 1M) to ground that forms a voltage divider with the unknown resistor. Measuring the voltage output of the voltage divider allows the calculation of the unknown resistance value.
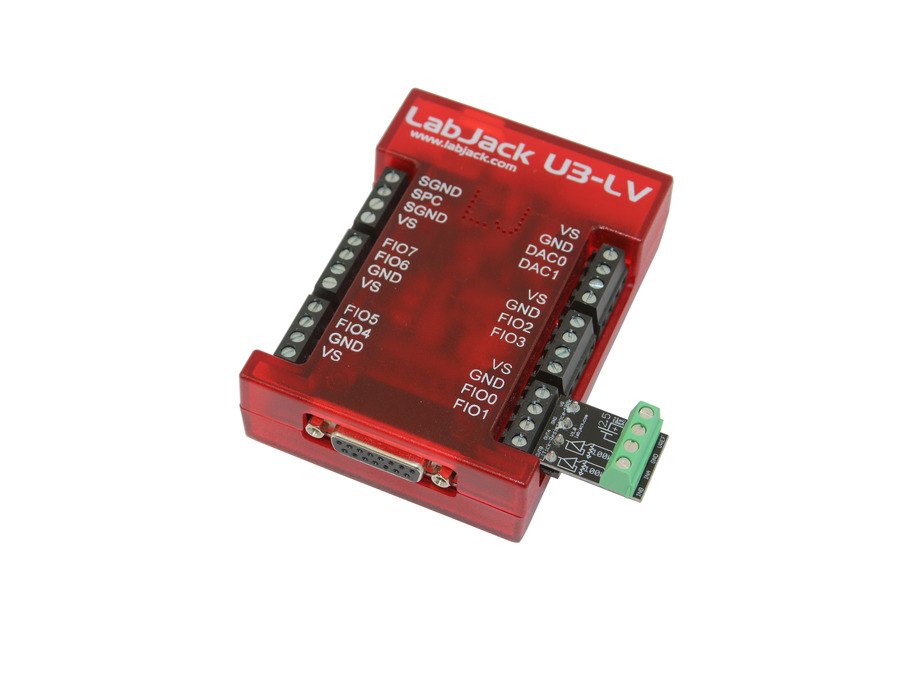
The LJTR connects to an analog input block on a U3, U6, UE9, T4, or T7 LabJack DAQ device. Thus, it uses 2 analog inputs and measures 2 resistances.
The LJTick-Resistance is not recommended for the T8 due to the lack of a 4 pin terminal block and differential inputs.

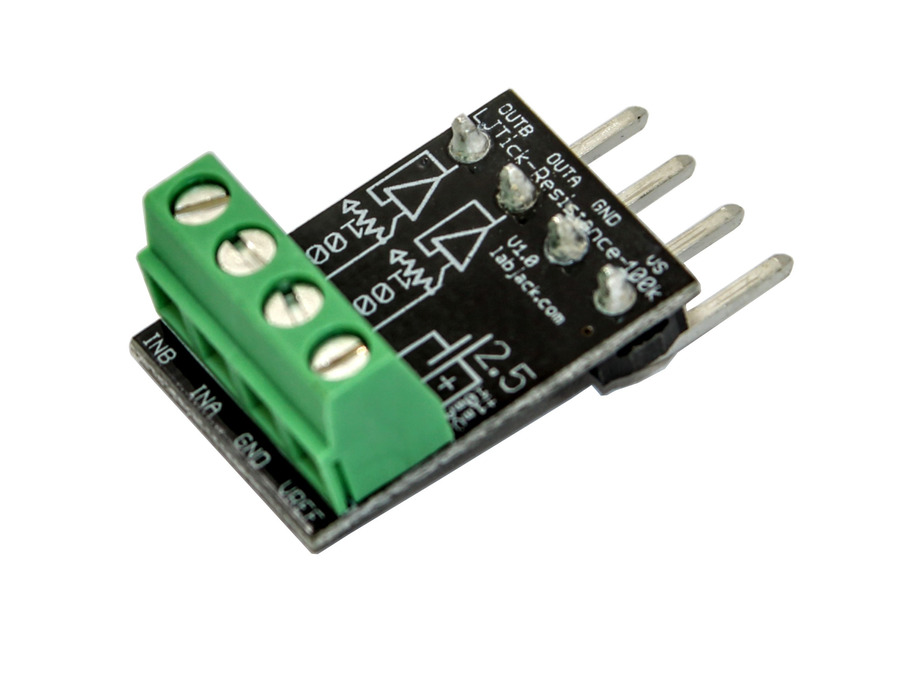
Figure 1: LJTick-Resistance

Figure 2: LJTick-Resistance With U3
Common Applications
The LJTR is designed to measure the value of an unknown resistance. Some common examples are:
Resistors
Thermistors
RTDs (PT100, PT1000, etc.)
Screw Terminal Descriptions
Vref: A 2.5 volt reference voltage output. Internally this reference is used for level shifting, but very little current is used, leaving substantial current available to the user, if a very accurate 2.5 volt reference is needed.
GND: Same as LabJack ground (GND).
VINA/VINB: These are the LJTick-Resistance input terminals.
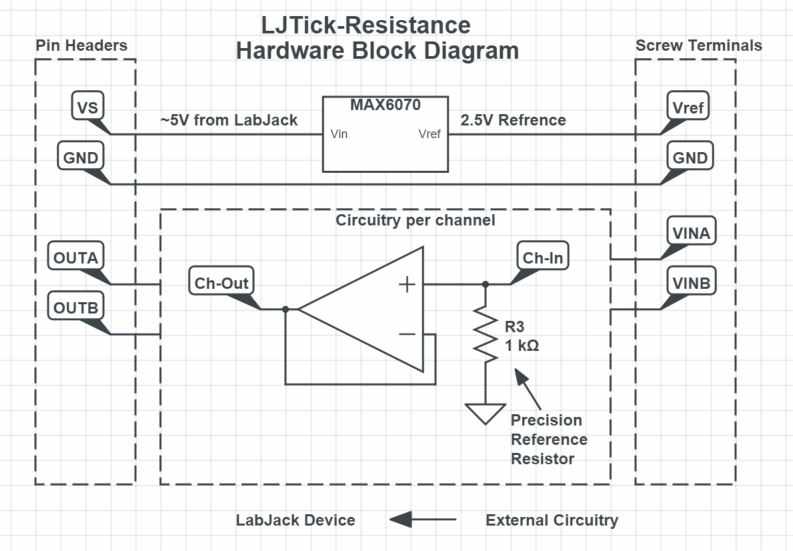
LJTick-Resistance Hardware Block Diagram

Figure 3: LJTick-Resistance Hardware Block Diagram
Note: The part labeled as the "Precision Resistor" is the 1k, 10k, 100k, or 1M precision resistor that varies between the LJTick-Resistance variants.
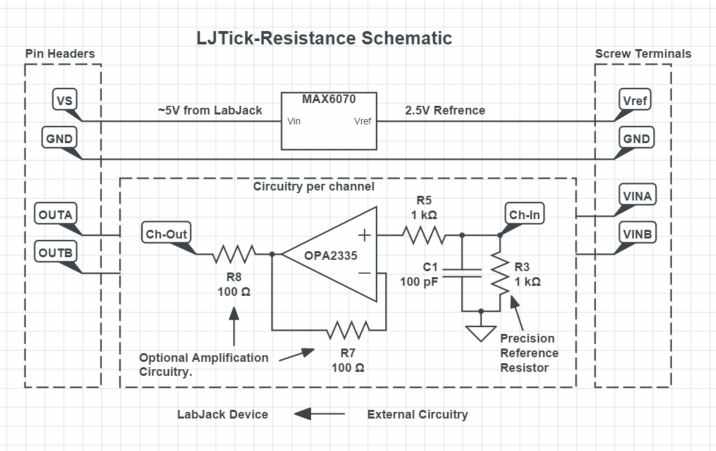
LJTick-Resistance Schematic

Figure 4: LJTick-Resistance Schematic
Note: The part labeled as the "Precision Resistor" is the 1k, 10k, 100k, or 1M precision resistor that varies between the LJTick-Resistance variants.
Equations
Typical wiring is to connect Vref to one side of the unknown resistance, and the other side of the unknown resistance to VIN. This forms a voltage divider with the precision resistor to ground which we will call Rfixed.
The Vref on the LJTR is exceptionally accurate. By specification it is more accurate than an analog input using the +/-10V range on even the U6-Pro and T7-Pro, so AIN feedback is generally not used but rather it is best to simply assume a constant of 2.500 V.
Vout = Vref*Rfixed/(Runknown+Rfixed)Runknown = (Vref-Vout)*Rfixed/Vout
Runknown = (2.5-Vout)*10000/Vout // LJTR-10k using the 2.5V reference
Example 1, PT100 RTD: For a PT100 you expect that it will be 100.0 ohms at 0 °C and the resistance will change about 0.385 ohms/°C (most common coefficient). Say room temperature is 22 °C and putting your fingers on the sensor warms it up to 25 °C. At 22 °C you expect 108.47 ohms and at 25 °C you expect 109.63 ohms. The voltages you expect are:
22 °C => 2.255361 V
25 °C => 2.253003 V
Example 2, PT1000 RTD: For a PT1000 you expect that it will be 1000.0 ohms at 0 °C and the resistance will change about 3.85 ohms/°C (most common coefficient). Say room temperature is 22 °C and putting your fingers on the sensor warms it up to 25 °C. At 22 °C you expect 1084.7 ohms and at 25 °C you expect 1096.3 ohms. The voltages you expect are:
22 °C => 1.199213 V
25 °C => 1.192577 V
Example 3, 10k Thermistor: The LJTR relationship between voltage and resistance is given above. To convert resistance to temperature we will use the Steinhart-Hart equation:
TempK = 1 / ( A + B*ln(R/R25) + C*ln(R/R25)^2 + D*ln(R/R25)^3 )
"R" is the actual thermistor resistance and "R25" is the nominal thermistor resistance at 25 degrees C. The coefficients A, B, C, and D are needed, so for the NTCLE100E3103 thermistor (for example) the datasheet tells us A=0.003354016, B=0.000256985, C=0.000002620, and D=0.00000006383.
For more information about using these equations in LJLogUD or LJLogM, see the LJLog/Stream Scaling Equations page.
Note that on the T7 there you can use the AIN-EF system to do resistance, thermistor, and RTD math, but still the above is useful for understanding and troubleshooting.
Low-Pass Filter
All variations of the LJTR have C1=100pF installed. This combines with Runknown to create a low-pass filter with a -3dB frequency as follows:
f = 1/(2*Pi*C1*(Ru+R1+R2))
Table 1. Cutoff frequency for C1=100pF with various source resistances.
Runknown [ohms] | -3dB Freq [Hz] |
100 | 15,923,566.9 |
1,000 | 1,592,356.7 |
10,000 | 159,235.7 |
100,000 | 15,923.6 |
1,000,000 | 1,592.4 |
10,000,000 | 159.2 |
100,000,000 | 15.9 |
The reason for the filter is that this type of resistance measurement application often leads to an input wire with very high source impedance which is therefore very susceptible to noise. For example, say wire A connects Vref to a 1M resistor, and wire B connects the other side of the resistor to VIN. Wire A is driven strongly by the low-source impedance Vref, and is not particularly susceptible to noise. Wire B, however, has 1M of source impedance and thus is weakly driving VIN, and is quite susceptible to noise. Capacitor C1 can help eliminate much of this noise.
Choosing the 1k, 10k, 100k, or 1M Version
A rule of thumb is to choose the version that most closely matches your typical resistance value, but to really get into details here is a spreadsheet that lists output voltage versus resistance for the different versions. Save a copy of this to your Google Drive or local machine if you want to edit.
For example, say you have a 10k thermistor and want to measure a 0.1 °C change around the area of 20 °C. From L73 we expect a resistance of 12260 ohms at 20.0 °C, and from F73 we know that we will get a change of about -490 ohms/degree round 20 °C, so at 20.1 °C we expect 12309 ohms. We put those resistances in B46 & B47, and then look at the resulting Vout changes for the different LJTR variations in row 52. We can see that the -10k variation gives the largest change at 2.467 mV and thus is a likely choice.
One other consideration, though, is that if we choose the -1k variation the voltages being measured are less than 1 volt so we can use the ±1 volt analog input range on the U6/T7 and get better resolution than on the ±10 volt range. Similar logic can be used to keep readings below the limit of a low voltage analog input on the U3 (2.44V) and T4 (2.5V).
Resolution
To evaluate resolution we need to look at 3 steps:
1. The thermistor or RTD has a varying resistance related to temperature.
2. The LJTR converts varying resistance to varying voltage.
3. The LabJack digitizes the varying voltage.
Thermistor Example
1. Let's say we plan to use a Vishay NTCLE100E3103 10k thermistor to measure from +20 to +150 °C. Use a chart provided by the manufacturer (or use coefficients with an online calculator) to find the resistance at the ends of the range of interest:
http://www.vishay.com/docs/29049/ntcle100.pdf
°C Ohms
15 15698
20 12488
145 205.5
150 182.6
We get the smallest change at the higher temperatures (only ~23 ohms), as expected with all NTC thermistors, so this is where we focus our further evaluation. We will look at 145 °C and 150 °C where the resistance changes from 205.5 to 182.6 ohms.
2. Use the LJTR equations from above, or a copy of our LJTR spreadsheet, to get the voltages. That results in 2.4497 volts at 205.5 ohms, and 2.4552 volts at 182.6 ohms. Thus a change of 0.0055 volts per 5 degrees, or 0.0011 volts/°C.
3. The noise level of our 12-bit class devices is generally just 1 or 2 counts, so to get the voltage resolution just look at span divided by counts. The input range of low voltage analog inputs (FIO/EIO) on the T4 is 0-2.5 volts, so voltage resolution is 2.5 / 2^12 = 0.0006 volts/count (U3 is about the same), which we combine with our 0.0011 volts/°C number from above to get:
(0.0011 volts/°C) / (0.0006 volts/count) = 1.8 counts/°C or 0.55 °C/count
So the resolution is about half a degree C when using this 10k thermistor with a U3/T4 to measure around 150 °C. For improvement move to a higher resolution device such as the U6 or T7 families, and for these high resolution devices use the applicable appendix in their data sheet to determine voltage resolution for different configurations. For example, from Table A.3.1.1 of the T-Series Datasheet, we see that the T7-Pro has an effective resolution of 0.0000057 V at Range=10 and ResolutionIndex=12 which equates to 0.005 °C.
RTD Example
1. Let's say we plan to use a PT100 that will be 100.0 ohms at 0 °C and has the standard response of 0.385 ohms/°C. We are interested in room temperature so we look at 22 and 25 °C.
°C Ohms
22 108.47
25 109.63
22 °C => 2.255361 V
25 °C => 2.253003 V
2. Use the LJTR equations from above, or a copy of our LJTR spreadsheet, to get the voltages. That results in 2.255361 volts at 108.47 ohms, and 2.253003 volts at 109.63 ohms. Thus a change of 0.002358 volts per 3 degrees, or 0.000786 volts/°C.
3. The noise level of our 12-bit class devices is generally just 1 or 2 counts, so to get the voltage resolution just look at span divided by counts. The input range of low voltage analog inputs (FIO/EIO) on the T4 is 0-2.5 volts, so voltage resolution is 2.5 / 2^12 = 0.0006 volts/count (U3 is about the same), which we combine with our 0.000786 volts/°C number from above to get:
(0.000786 volts/°C) / (0.0006 volts/count) = 1.3 counts/°C or 0.76 °C/count
So the resolution is about 3/4 a degree C when using a PT100 with a U3/T4. For improvement move to a higher resolution device such as the U6 or T7 families, and for these high resolution devices use the applicable appendix in their data sheet to determine voltage resolution for different configurations. For example, from Table A.3.1.1 of the T-Series Datasheet, we see that the T7-Pro has an effective resolution of 0.0000057 V at Range=10 and ResolutionIndex=12 which equates to 0.007 °C.
Accuracy
Now we continue the above resolution discussion to move into the realm of accuracy. As with most signals, the best accuracy is usually achieved with an in-situ calibration. This means connecting everything up and then at different temperatures note the voltage reading from a particular channel and the actual temperature from some reference or known condition. Then use that information in your software to equate further voltage readings to temperature.
Without an in-situ calibration, no calibration is applied and thus an error analysis needs to be performed on the entire system to come up with total error. Such an analysis is quite complex, but we can look at a list of error sources and see which appear important.
1. Accuracy of the thermistor or RTD itself in its conversion of temperature to resistance. The datasheet for the Vishay NTCLE100E3103 10k thermistor says the R25 tolerance is ±2.0% (best grade) and the Beta tolerance is ±0.75%.
2. Accuracy of the LJTR in its conversion of resistance to voltage. One source of error is the reference voltage accuracy of ±0.04%. The other notable source of error is the tolerance of Rfixed which is ±0.05%.
3. Accuracy of the LabJack in its digitization of the voltage. For the T4 this is found in Table A.3-1 of the T-Series Datasheet and is 0.13% full-span. For the T7 this is found in Table A.3-2 of the T-Series Datasheet and is 0.01% full-span.
4. Voltage drop error due to sensor wire resistance. See the related information in our RTD App Note.
In this list of errors, #1 is dominant for this thermistor and the other error sources are negligible. Some RTDs have a much better accuracy rating and thus the other errors might be important.
Specifications
Parameter | Conditions | Min | Typical | Max | Units |
General |
|
|
|
|
|
Vs, Supply Voltage (1) |
| 2.8 | 5 | 5.5 | Volts |
Supply Current |
|
| 1.2 |
| mA |
Operating Temperature |
| -40 |
| 85 | °C |
|
|
|
|
|
|
VREF |
|
|
|
|
|
Output Voltage |
| 2.499 | 2.500 | 2.501 | Volts |
Initial Accuracy |
|
|
| ±0.04 | % |
Maximum Output Current |
|
| 10 |
| mA |
Temperature Coefficient |
|
| 1.5 | 6 | ppm/°C |
|
|
|
|
|
|
Op-Amp Buffer |
|
|
|
|
|
Typical Input Voltage Range |
| -0.1 |
| VS - 1.5 | Volts |
Typical Output Voltage Range | Load ≥ 100kΩ | 0.001 |
| VS - 0.001 | Volts |
Input Bias Current |
|
| ±70 | ±200 | pA |
Offset Voltage |
|
| 1 | 5 | μV |
|
|
|
|
|
|
Rfixed |
|
|
|
|
|
Accuracy |
|
|
| ±0.05 | % |
Temperature Coefficient |
|
|
| ±10 | ppm/°C |
|
|
|
|
|
|
Physical |
|
|
|
|
|
Width |
|
| 0.78 |
| Inches |
Length |
|
| 1.1 |
| Inches |
(1) The maximum input voltage to the buffer amplifier is VS-1.5, so for proper operation with signals up to 2.5 volts, VS must be greater than 4.0 volts.
For more specifications about the reference voltage IC and Op Amp used in the LJTick-Resistance look at the following datasheets:
Maxim MAX6070 datasheet
Texas Instruments OPA2335 datasheet
