This app note was originally written when the T7 was the only T-series device, however most of the information about the T7 applies broadly to any T-series device with Ethernet.
This application note exists to provide a basis for more detailed discussion, and also help beginners with network setup and configuration. Some troubleshooting steps for common networking problems are also included at the end.
General Terms
For the sake of a quick disambiguation, basic functionality of each component is listed below.
-
Modem - Connects a local network to the internet by linking to internet provider infrastructure.
-
Router - Provides gateway/firewall for the internet. Routes traffic from each PC or other device on a local network to the appropriate location. Most routers can also act as a DHCP server, which allows them to grant IP addresses for DHCP enabled network devices. If it is a wireless router, it also includes a wireless access point which creates a WiFi network that has a name (SSID), password, and a type of encryption (WPA, WPA2, WEP, etc).

-
Switch/Hub - Expands total available Ethernet jacks.
-
Bridge - Connects multiple network segments, which are physically or logically (by protocol) separate. Bridges connect to wireless access points.
-
Wireless Access Point (AP) - Creates a WiFi network that has a name (SSID), password, and a type of encryption (WPA, WPA2, WEP, etc).
-
Mobile Hotspot - When generated by a cell phone, it is a wireless access point, DHCP server, and a modem all-in-one. Internet access is gained through the cell network (3G, 4G etc).
-
Subnet - A group of computers and devices which share a common IP address component. Subnets are often designed to correspond with physical computer groupings. A single small building, house, or department will usually just be a single subnet. For instance, 192.168.1.* designates a subnet of 192.168.1
-
DHCP Server - Assigns IP addresses to client computers. Keeps track of the "pool" of available IP addresses.
Typical Home/Small Office Network
The most common way to setup a home or small office network is to buy a wireless router, and just connect everything to it. When there are no longer any available LAN ports on the router, it's possible to expand the number of LAN ports with a simple switch/hub. Figure 2 shows how a LabJack device will typically be connected in this type of network.
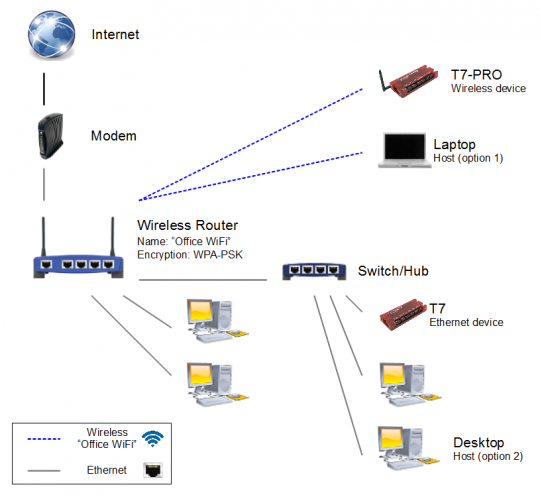
In Figure 2 above, the computer controlling the LabJack device is referred to as the "Host". The host sends/receives data to/from the LabJack device by using the device's IP address. In order for communication to work, both the host computer and the device need to have a unique IP address that is valid on the network.
Static IP vs Dynamic IP (DHCP)
Each device/host on the network has a unique numerical IP address. Other things on the network use that address to connect to and talk with that device/host. There are two standard ways of obtaining an IP address.
-
Static IP: The device/host always has the same manually assigned IP address. For instance, your router might have the static IP of 192.168.1.1, meaning the router is always reachable at that address.
-
Dynamic IP: The DHCP server (typically the router) assigns each device/host on the network a unique IP address. The DHCP server also keeps track of the "pool" of available IP addresses, so that if a computer is removed from the network, its IP address can be reused.
The advantage of the static IP is that it is always the same, but the disadvantage is that you have to assign it to the device/host and it must be unique. If two devices are assigned the same IP, conflict will occur when both devices are ON. By using DHCP you ensure that each IP is unique (since the DHCP server assigns them that way) but you have to find out which IP address was assigned to a device/host before you know which IP address to use to talk to it. Our Ethernet/WiFi LabJack products support both static IPs and DHCP. DHCP is convenient, but not all networks allow searching to find devices and searching is slower than a specific open, so static IPs are usually best for the end user's production applications.
Setting up a LabJack Ethernet/WiFi Device
The first step to connecting an Ethernet or WiFi LabJack device is to connect it to the computer using USB, and configure the IP, Subnet, and Gateway according to your particular network.
UE9 Setup
1. Connect the UE9 over USB, and open the LJControlPanel application.
2. Enter the IP Address, Subnet, and Gateway parameters in LJControlPanel. Enable DHCP if you want to automatically get a unique IP address. For DHCP to work, the UE9 Ethernet must be connected to an operational network, like Figure 2.
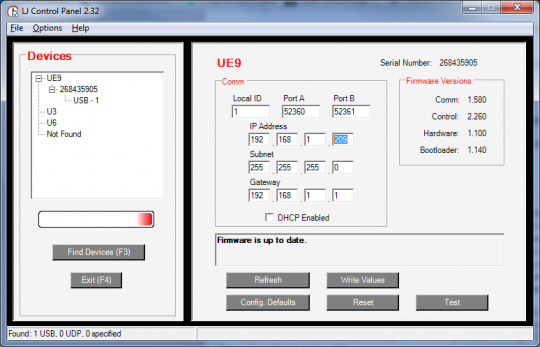
3. Then click Write Values to make the change permanent. After changes are saved, LJControlPanel will prompt to reset the device.
4. Finally, make sure the UE9 Ethernet is connected to an Ethernet jack on the network, and Click Find Devices again to verify that the device exists on the network.
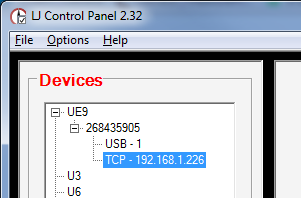
See the Ethernet troubleshooting section below, or the UE9 Ethernet Test App page if there are problems.
T-Series Setup
See the Setup WiFi and Ethernet for T-Series App Note.
Setting up a Wireless Access Point
As stated above, a wireless access point (AP) is just a wireless link into the network. The most common configuration is shown in Figure 2, where the router creates an AP, and WiFi devices connect to the AP. Access points are configured with the following parameters:
-
SSID - Also known as the "Name" of the wireless network. Devices will associate themselves to the network using this name.
-
Authentication - WEP (old), WPA, WPA2, WPA2-PSK, WPA2-ENT. Typically people use WPA2, or WPA2-PSK. We recommend WPA2, since we primarily test our devices with WPA2.
-
Encryption -AES or TKIP (most likely others).
-
Password - Self explanatory. Some encryption methods require 8 or more characters.
The T7's WiFi chip only supports the following authentication/encryption pairs (We highly suggest using WPA2-PSK with AES encryption):
-
WEP-64 and WEP-128 (open mode only, NOT shared mode)
-
WPA2-PSK (AES only). This is the recommended configuration. Other authentication/encryption options are not as secure and may not work properly.
-
WPA1-PSK (TKIP only)
-
WPA-PSK mixed mode (some access points, not all are supported)
1. Connect a computer to one of the LAN Ethernet ports on the back of the router. Note: Do not use a WAN, or Internet Ethernet port.
2. Launch a web browser and enter one of the following in the browser's address bar:
-
routerlogin.com
-
routerlogin.net
-
Access point default IP address, e.g.
192.168.1.1
You are prompted to log in
3. Enter your username and password. Defaults are commonly admin/admin, or admin/password.
4. Specify SSID, Encryption, and Password, and enable the wireless network. Save or apply the changes.
Note: If you are configuring a router to be an access point only (not using it for internet, or DHCP server), then you should disable anything relating to "DHCP Server" or "Internet". This is shown in figure 2 of the Expanded Networks section of the Advanced Networking App Note.
T7-Pro Direct to Computer via WiFi
Wireless access points can also be created by some devices, such as tablets, cell phones, and laptops. Figure 8 demonstrates a cell phone that is configured as a Mobile Hotspot, which is just an access point that provides mobile internet access. The Laptop communicates with the T7-Pros, and is therefore considered the "Host" of the T7-Pros. The cell phone is acting as a relay for signals, but is not itself communicating with the LabJack devices.
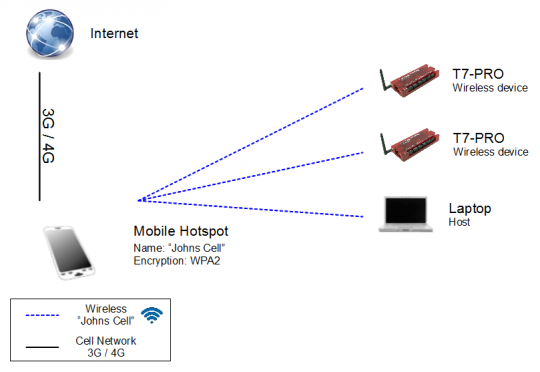
Figure 9 demonstrates a laptop that is configured as an AP. Configure a laptop as an access point by using special software, or natively in Windows 7 and other new operating systems. Several virtual access point programs can be found through Google.
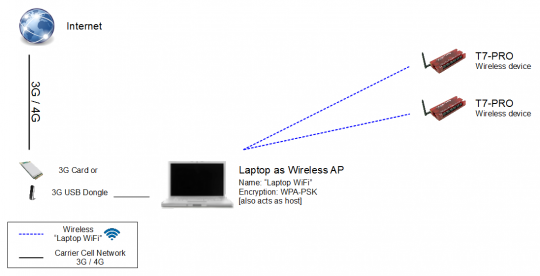
In our experience we have found that some virtual APs just do not work. Sometimes they will even allow a smartphone to connect, but for whatever reason are not compatible with the WiFi module in the T7-Pro. The problems are noticed right at the start when you create a new access point and have the T7-Pro try to join it. If it does work and the T7-Pro joins the network it is generally as reliable as any other WiFi network. For more help see the troubleshooting tips towards the end of the Basic Networking & Troubleshooting App Note and also the WiFi specific troubleshooting tips on the Setup WiFi and Ethernet for T-Series Devices App Note.
Some options to consider
-
Try the VAP included with Win 7 or newer. For Windows 10 you need to have the August 2016 Windows Anniversary Update: https://www.howtogeek.com/214080/how-to-turn-your-windows-pc-into-a-wi-fi...
-
Try 3rd-party VAP software. In our most recent testing mHotspot worked best. We also had success with Connectify.
-
If neither #1 or #2 work with the built-in WiFi adapter on your laptop, disable that adapter and add a new adapter to try. We tested the TL-WN725N with success, but the best option (also tested successfully) might be the Aukey WF-R13 wireless adapter and their provided software. Aukey provides a program called "Mediatek Wireless Utility" that enables you to configure the Aukey WF-R13 wireless adapter as a wireless access point with a customized SSID name, WiFi channel, and WPA2-PSK authentication using AES encryption.
-
Use an external access point (i.e. router) giving you Figure 2 above. There are very small ones that could go near the T7-Pro or near the laptop. The computer and T7-Pro can both connect to the access point by WiFi or Ethernet. The ideal solution is often to put the access point near the T7-Pro and make that connection via Ethernet, as the Ethernet connection on the T7-Pro is much faster than WiFi. This works with all T-series devices via Ethernet connection.
-
Use the Ethernet connection on the T-series devices to connect to a nearby Ethernet-WiFi bridge. This has the added advantage of high data rates, as an external wireless bridge should support full Ethernet speeds. See Using a WiFi Bridge.
WiFi AP troubleshooting
After reading a few articles and hearing about several customers having WiFi AP issues where the T7-Pro was not able to connect to an access point hosted by a computer, there may be a particular feature required by the T7-Pro's WiFi chip that not all wireless adapters have. In other words, not all wireless adapters are created equal. If you want to host a wireless access point that the T7-Pro can connect to, the network card likely needs to have a "Soft AP" capability. On Windows 10, you can type the command netsh wlan show wirelesscapabilities into a command prompt to list the available wireless adapters installed on the computer and what capabilities it has. The Soft AP mode should list Supported next to it. The T7-Pro may not be able to connect to all created ad-hoc networks but can most likely connect to all created SoftAP networks, especially when they offer WPA2-PSK authentication using AES encryption.
Another useful command is netsh wlan show interfaces which prints out a list of WiFi interfaces and their status which indicates signal strength and network speed.
Setting up WiFi AP (Soft AP, Ad-Hoc, etc.) Sources:
-
WiFi Diagnostics from Windows 7 or Vista Command Prompt by Tony Fortunato.
-
Windows 7 - Collect Wireless Signal Strength via Command Line by StackExchange.
-
How to manage wireless networks using command prompt windows 10 by Windows Central.
-
What is the difference between SoftAP and Wi-Fi Direct by StackExchange.
-
What is the fundamental difference between ad-hoc and softAP WiFi network? by StackExchange/Stackoverflow.
-
WEP, WPA, WPA2, TKIP, AES, CCMP, EAP by Cisco/The Cisco Learning Network (forums).
-
How do I set up an ad-hoc WiFi network in Windows 10? by Microsoft Community. This tutorial was not able to be followed on a Windows 10 Pro computer (Surface Pro 3) 10/12/2016. We got this to work with secondary adapter and adapter switching instructions (3/23/2017).
-
Create Ad Hoc WiFi Hotspot in Windows 10 by Redmond Pie. This tutorial again didn't work on a Windows 10 Pro computer 10/12/2016. Final step "netsh wlan start hostednetwork" reported "The hosted network couldn't be started." We got this to work with secondary adapter and adapter switching instructions (3/23/2017).
-
Virtual WiFi - How to select a specific WiFi-Adapter as "hostednetwork" by Microsoft Community. This article shows how to disable your primary network adapter so that a secondary adapter can be used to start a hostednetwork and then re-enable the default adapter.
-
Another potential source to Windows 8 and Windows 10 Adhoc network support removal is this FAQ page.
Default LabJack Device IP Addresses
|
T4 Ethernet |
192.168.1.204* |
|
T7 Ethernet |
192.168.1.207* |
|
T7-Pro WiFi |
192.168.1.217* |
|
T8 Ethernet |
192.168.1.208* |
|
UE9 Ethernet |
192.168.1.209 |
* The T-series devices have DHCP enabled by default. These defaults only apply if the SPC jumper is used to force static.
UE9 or T-Series Ethernet Troubleshooting
See the Ethernet Troubleshooting App Note.
T-Series WiFi Troubleshooting
See the WiFi Troubleshooting App Note.
